Winter Keepsake Process Art

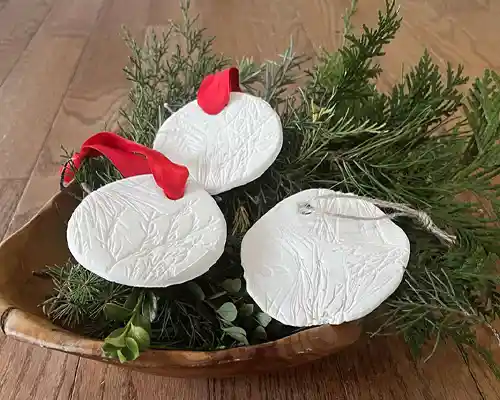
Create a one-of-a-kind seasonal treasure with clay and items from nature.
Create a one-of-a-kind seasonal treasure with clay and items from nature.
Ages/Grades
Preschool, Early Elementary, Toddlers (with supervision & support)
Learning Domains
Science, Language Development, Fine Motor, Creative Arts
Materials
• Clay (Crayola Model Magic, air-dry clay, or homemade salt dough)
• Natural items from evergreen trees
• Round dough cutters or household items to make circles
• Segment snipped from a plastic straw
• Ribbon, string, or twine for hanging
Ready, Set, Create!

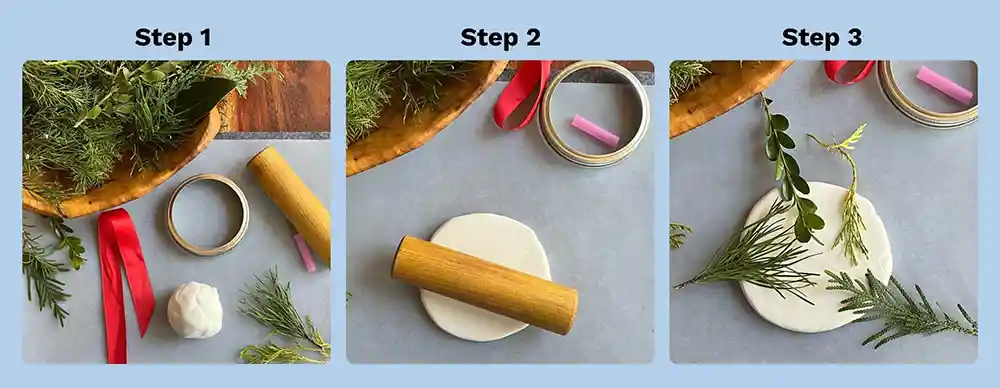
![]() Gather materials
Gather materials
![]() Knead your clay until it’s soft and malleable. Using your hands, form it into a ball. Then press it onto your work surface, rolling to a smooth surface about ⅓” thick.
Knead your clay until it’s soft and malleable. Using your hands, form it into a ball. Then press it onto your work surface, rolling to a smooth surface about ⅓” thick.
![]() Arrange your nature elements so that part of each stem extends beyond the edge of the clay. This makes it easier to remove after it is pressed into the clay.
Arrange your nature elements so that part of each stem extends beyond the edge of the clay. This makes it easier to remove after it is pressed into the clay.

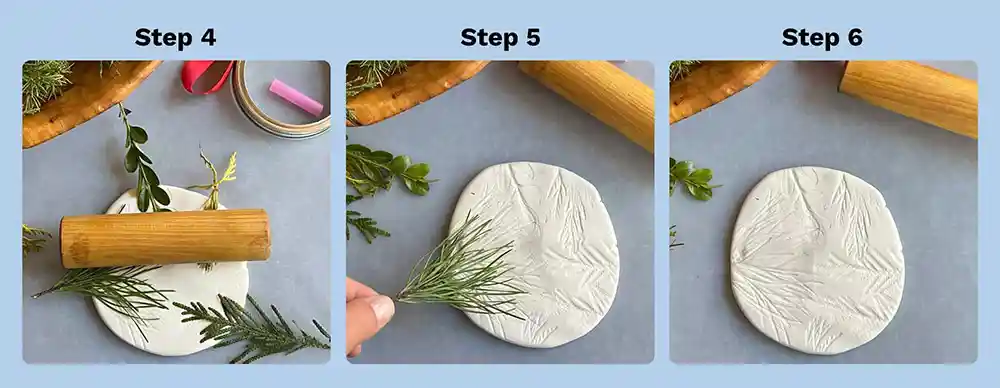
![]() Gently roll over the foliage, pressing the materials into the clay to create impressions.
Gently roll over the foliage, pressing the materials into the clay to create impressions.
![]() Carefully remove each piece, starting from the bottom of the stem and gently pulling it up and away from the clay.
Carefully remove each piece, starting from the bottom of the stem and gently pulling it up and away from the clay.
![]() If desired, additional impressions may be layered. However, note that layering textures may make the details of the initial impressions less distinct.
If desired, additional impressions may be layered. However, note that layering textures may make the details of the initial impressions less distinct.

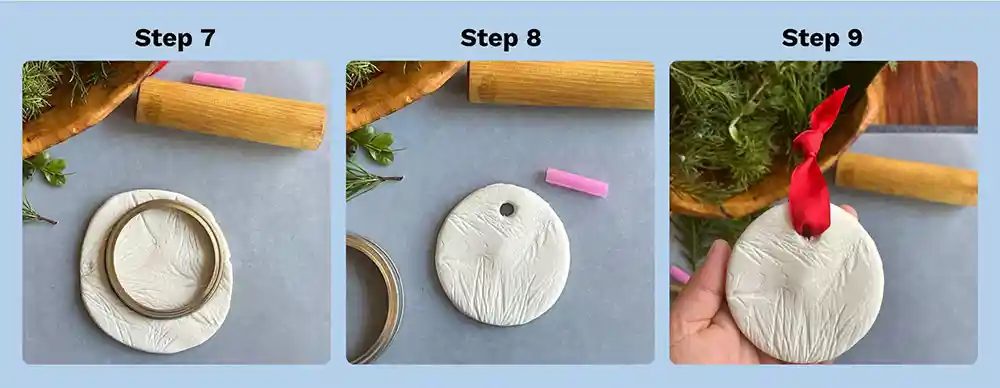
![]() Use a cookie cutter or another household item to cut out a circle.
Use a cookie cutter or another household item to cut out a circle.
Option: Omit this step for a larger clay impression with more natural edges.
![]() A segment of a straw is a great tool to punch tiny circles. Make a hole so that you can thread a ribbon or string once your clay is dry.
A segment of a straw is a great tool to punch tiny circles. Make a hole so that you can thread a ribbon or string once your clay is dry.
![]() Allow the clay to dry on both sides. Add ribbon, string or twine for hanging.
Allow the clay to dry on both sides. Add ribbon, string or twine for hanging.
Engage Children in Conversation
Using these natural materials creates many opportunities to discuss deciduous and evergreen trees.
Why do deciduous trees drop leaves in the winter?
Why do evergreen trees keep their leaves and needles?
What do you notice about the foliage from the evergreens that you collected? What is the same and what is different when compared to leaves from deciduous trees?
Use open-ended questions to invite discussion about children’s creative process.
Do you have any predictions about the textures and impressions these materials might make?
What happens when you press the roller gently? What happens when you press more firmly?
Some evergreens have foliage that is flat, and some are more dimensional. What do you notice about the kinds of impressions that these make?
Extensions
Once dry, use a thin layer of paint to add color to creations. Avoid thick layers of paint that may make the subtle textures difficult to see.
Make homemade salt dough to use as the medium for this project:
Mix together 4 cups flour, 1 cup salt, and 1.5 cups of warm water. Once it becomes too dense to stir, knead with your hands until the dough is uniform and soft, about 5 minutes. Salt dough creations can be air dried or baked in a 250-degree oven. Baking times will depend on the size of each creation, so monitor your baking carefully.
Modifications
![]() Children who have difficulty removing the foliage from the clay may find tweezers or a similar tool helpful.
Children who have difficulty removing the foliage from the clay may find tweezers or a similar tool helpful.
![]() If access to natural items is a challenge, use household objects to print textures and shapes. Cardboard tubes, washable toys, and many kitchen items provide interesting textures and impressions. Dough rollers and sensory stones also create interesting textures and impressions.
If access to natural items is a challenge, use household objects to print textures and shapes. Cardboard tubes, washable toys, and many kitchen items provide interesting textures and impressions. Dough rollers and sensory stones also create interesting textures and impressions.
